

How To Create Honey Bee Box
I'm a proud apiarist who appreciates the benefits of making his own nuc boxes, not least of which is saving a boatload of money!
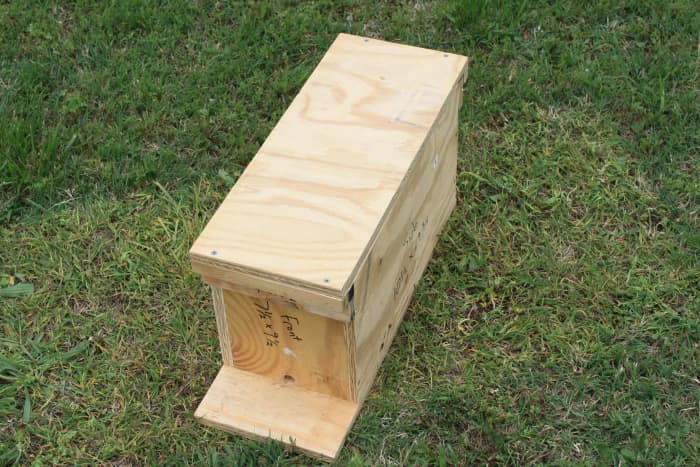
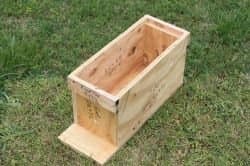
A DIY nuc box.
DIY Nuc Plans
Beekeeping is a very rewarding hobby. Just think about all that delicious, golden honey flowing . . . mmm! But those of us who have been keeping bees for a while know that you eventually need to start splitting your hives to prevent them from swarming. Another advantage of splitting is to make a new hive for another beginner to start their own apiary. Or perhaps you are the adventurous type and are interested in rearing your own queens.
Whatever your motivation is for splitting your hives, you will need the proper equipment to do so. One of the most important pieces of equipment you will need is the box, and that is where nucs come in very handy. A nuc (short for nuclear colony) is a smaller bee box that makes it easier for a fledgling colony of bees to get a strong start.
The problem is that they aren't exactly cheap, especially if you are buying several at a time. But with basic woodworking skills, you can easily make your own nucs. This article is dedicated to teaching you how to make your own nucs!
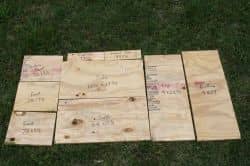
Wood cutting pattern for a nuc box.
Step 1: Cut Your Wood
The first step is the most time-consuming, especially if you have never done it before. Once you have made a nuc or two, it starts to become a breeze. If you study the picture carefully, it has every piece laid out on a 2' x 4' piece of plywood. I use 3/4 inch plywood. I tried 1/2 but it didn't hold up at the joints nearly as well. Spend a few extra dollars for the good stuff, your bees will thank you.
Let me list out the dimensions of the pieces, just in case you can't quite read them in the picture. The parts are from left to right:
- 2 Front Walls: 7 1/2 x 9 1/2 (you will actually get three from the cut outs)
- 2 Front Tops: 9 x 2 1/2 (these become the handles of the box)
- 2 Side Walls: 10 1/2 x 19 3/4
- 1 Top: 9 x 22 3/4
- 1 Bottom: 9 x 24 (can be shorter if you like smaller landing areas for your bees)
Once you have cut the pieces, you are ready to start your assembly. Yes, that's it, no more cutting or routing or anything else!
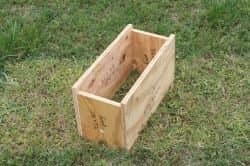
Adding sides to your nuc.
Step 2: Add Sides
There are several styles of putting the box together, but it really comes down to nails or screws. Nails are a bit easier to use, but screws will last much longer. I've chosen to put a bit more effort into it and use the screws.
One word of caution if you do choose to use screws: Due to the fact that you are driving them into the end and side of a piece of wood, it is strongly advised to drill a pilot hole before you actually drive your screws. This will keep the wood from cracking.
It is also advisable to drive the screws or nails as straight as possible so you won't have sharp objects poking out, ready to impale you. Oddly enough, this tip is more for you than your bees. You will never hear your bees mumbling about any pointy objects they stubbed their toes on, but you will certainly hear about the beekeeper that ripped his jacket and let a good number of bees sneak in to sting him!
- This step would be a tad easier if you had a third arm (as many tasks would), but it really isn't that bad. All you need to do is attach the sides to the OUTSIDE edges of the front and back. This is important since if you don't do it, your nuc won't be wide enough to accommodate the five frames you need.
- I usually use two screws at each joint. You may want to add a third, but watch out that you don't apply too much pressure and split the wood.
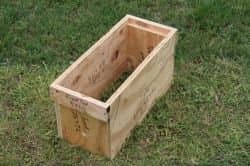
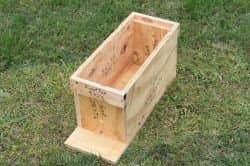
Adding handles to your nuc.
Step 3: Add Handles
The part I love most about this design is that the handles actually double as the ledge that the frames rest on. Many other designs require that you use routers or other fancy techniques, but this is much easier.
- Take the smallest pieces of the cutout and place it on the front, flush with the top of the sides. It will overlap slightly with the front panel and sit flush with the outside of the side walls.
- Screw it in place with one screw on each side. Again, you may want to add an extra screw to give you a warm and fuzzy feeling, but one usually does the trick.
- Flip the box over and repeat for the back handle and ledge.
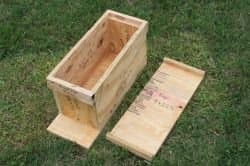
Attaching a bottom board to my nuc box.
Step 4: Attach the Bottom Board
Because even bees need a floor . . . although technically speaking, this step is optional. Sometimes you want to make a second story to a nuc that you already have going. In that case, you wouldn't need a bottom board at all. It will simply set on top of the current nuc. You can have many boxes stacked on top of each other.
Read More From Dengarden
- If you do choose to add the bottom, flip the box over and lay the bottom board on it. You need to decide which end will be the front.
- The extra length of the bottom board will hang over on the front end. This will eventually become the landing pad for your bees.
- Once again, screw this onto the box, usually one screw on the end and two on each side. I used to screw on the front until I started ruining my drill bits in the next step. You see, if you put the screw through the center of the front, then when you drill the entrance hole, you will drill right through your screw. Not a pretty sight seeing your bits all chewed up. With a bit of experimentation, I discovered that it doesn't really help much to even have a screw on the front.
Drilling holes in my nuc box.
Step 5: Drill Holes
The bees need a door, right? The size and location of your entrance matters. First, if you ask five different beekeepers what size entrance holes should be, you will probably get six answers. I make my entrances 3/8 of an inch for three reasons:
- It gives them plenty of room to come and go.
- It is small enough to defend against pests and robber bees.
- Most rodents have trouble getting through a hole that small when seeking shelter.
As far as the location of the front entrance, be very careful when deciding where you place it! I have heard of people leaving up to an inch between the bottom board and the hole. Note that this plan has a solid bottom board which does not accommodate water drainage, so if you aren't careful, you could end up with an inch of bee soup in the bottom of your hive instead of honey.
I put my front entrance as close to the bottom board as possible. This allows for adequate drainage. The rear entrance is typically an inch or so under the rear handle. I leave this room just in case I need to move the box and a handful of bees have decided to hang out on the back porch. It is important that you do drill both openings, as it will provide much better ventilation for the hive.
Making the nuc lid.
Step 6: Make the Lid
The lid is the easiest part of the entire job. Simply take the last remaining piece and screw two pieces of scrap that you have from the cutting step to the ends of the top piece and **poof** you have a lid.
The only mistake that I have ever made in this step was not doing a test fitting before I screwed the scraps on. It is a good idea just as a sanity check to make sure that the lid will actually fit on top before you screw them down.
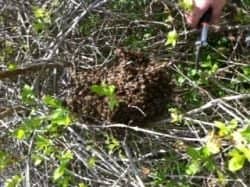
Catching bees.
Bonus Step: Add Bees!
While it is rewarding to be able to make your own nuc boxes, it is fairly boring to watch an empty box. Go out and find a swarm or get in touch with your local beekeeping guild so you will have some little critters that call your box a home. They will love your newest creation, I promise!

Good nuc boxes.
Important Details
- The box should fit snugly with the lid. The last thing you want is to have a gust of wind blow the roof off of your honey bees' house.
- The lid should also fit flush with the rest of the hive. If there is any bowing of the lid, it can get drafty and fail to retain crucial heat during winter months.
- The entrance should not be too large. It doesn't take a large hole to allow the workers to come and go, so keep it small so rodents can't get in. It also makes it easier for the bees to protect their hive.
Why Is It Best to Make Your Own Nuc Box?
The answer is quite simple: it is much cheaper. The nucs that I used to buy were about $25, not including shipping. The ones that I make now cost me $3.50. Holy savings, Batman!
Beekeeping can become a very expensive hobby. Many people say that there is no money in keeping bees, but that isn't really true. The people that shell out tons of cash are the ones that buy overpriced equipment. If you are frugal with this hobby, it will definitely pay for itself many times over.
Nuc Box as a Bait Hive: Catching Wild Swarms of Bees
If you are looking to expand your number of bee hives by attracting wild bees, a nuc box is one of the best tools you can use.
- Select a wooded area that is fairly accessible.
- Put a piece of old comb in the box with a few frames and hang it about 10 feet off the ground. A swarm is more likely to pick this box than other places because it smells like an old hive was there because of the comb and because it is up off the ground.
- This method can bring you a few extra hives a year if done correctly. Hey, who doesn't like free bees!
I'd love to hear from you and your experiences making your nucs. Do you have any other plans that you have had luck with? Let me know and I will feature it for you!
This content is accurate and true to the best of the author's knowledge and is not meant to substitute for formal and individualized advice from a qualified professional.
© 2012 jeffrichley lm
Have you tried making your own nuc?
Rowdy on August 14, 2020:
The landing board is to wide. Birds land there also. no more than 1.25 inches, or your bees become bird food.
NELSON VLADIMIR SENIOR on June 30, 2020:
THANK YOU I DID GET THIS INFO & MODIFY FOR A 3 FRAMES NUC BLESSINGS FROM NORTH TEXAS
Dave Navarro on May 16, 2020:
Used your plan and made a Nuc box today. Turned out great. Would post a pic if I could. Next step is to go swarm hunting. Thanks.
Glenn Abuja on February 12, 2020:
Thanks for sharing. Ill make this shortly!
sinan dogrul on January 13, 2020:
can you give this sizes with the metric system
William Anderson on January 02, 2020:
Very good design, easy to build. I added a few extras like more ventilation holes in base and back. Door for the entrance for when I am shifting them. And locking dowels on the lid so I don't have a problem when in transit. Thanks Bill
Bill, Loranger-la on November 18, 2019:
I have never kept Bees before but I have always been very interested in trying!
kathy b on August 03, 2019:
I just made this!!!!!! beyond easy if you have basic woodworking skills. I got all my wood at the resale/reuse site we have in town and made the entire box for under 3 dollars. I only used pine and some finished plywood. I'm hoping to make a few more so I can overwinter some nucs. thank you for the easy plan. would post a picture but I don't know how.
chriss stylianou on April 09, 2019:
not yet
ian on March 01, 2019:
you cannot buy 3/4 inch plywood for $14 per 4x8. you can find 15/32 for that price, but nowhere have I found 3/4in at this price point.
Happysan69 on February 09, 2019:
What size screw do use for the box
Ethan on January 18, 2019:
Howdo you make the frames
Cin D on January 02, 2019:
I believe the answer to the cost questions posted below is because he originally made the post in 2012 when plywood was cheaper.
HoneyBeeMan on December 26, 2018:
You only get 4 nucs from a 4 x 8 sheet of plywood. Even using the cheap 1/2" plywood at $24 per sheet that would be $6 per nuc, but you advise using 3/4" plywood would be about $36 per sheet which would bring the cost per nuc to $9 per nuc. This is without considering cost of fasteners. Can you explain what you have learned to build a 3/4" plywood nuc for $3.50 per nuc?
Josh Albrecht on October 08, 2018:
how does it cost 3.50 cents for a box when it cost more than that for even just a 2'x4" piece of plywood?
Kenken on July 08, 2018:
Hello sir, im a newbie in beekeeping, just wanna ask where i can put the food if i put 5 frames.....thank you
Mel on April 28, 2018:
@Kevin
Based on the dimensions, it would house deeps.
KEVIN on March 20, 2018:
What are your frame sizes ... or did I miss that?
Katie Adams on March 19, 2018:
Update: caught my first swarm with this box. So, glad it worked. I don't know if my picture will attach.
IMG_3498.jpeg
Rich Wilkie on February 21, 2018:
Great design!!!!! I found the 19 3/4 length just a little too long for the frames so I shrunk it by 3/8. Make sure your frames fit before you glue and screw. I also put two 3" holes in the bottom and covered them with hardwire cloth. It's a nice touch for ventilation.
K. Adams on February 10, 2018:
Made it! Thank you for sharing!
jeffrichley lm (author) on August 17, 2017:
@Rob S, I typically get a full sheet of plywood and make 4 boxes out of it. At the time of writing, I was getting them for around $14 a sheet. Price may have gone up to $4 each now. :)
SmayWork on March 13, 2017:
Just found this post last night. I had a bunch of scrap pieces of concrete form plywood. Very nice stuff. Had concrete debris on the one side, so I built one of your Nuc boxes in about and hour putting the bare side facing inside. Then painted it and formed a aluminum clad top. Net cost $0.00, just a couple of hours. Hope to see if I can catch something. Thanks
Rob S on March 13, 2017:
How did you come up with the 3.50 cost? I can't find any ¾ plywood under $12 for a 2'x4' section. Thank you
Mr'B on June 07, 2016:
You can mount a Nuc on side of your top bar hive so you can transfer from trap to hive very simple I have 5 I built and they are healthy.
Turkeyfarmer on May 17, 2016:
I have caught 6 swarms so far thanks for the nuc measurements great little box
Ken B's on April 22, 2016:
Suggested add-ons to nuc lid.
From the scrap wood:
1. Cut 4 small pieces and attach them to
the outside left and right corners,
both front and back, to prevent the
lid from sliding left to right.
2. Attach strips of wood to the front
and back edges of the lid to grasp
for easy removal.
Glue up the project before drilling pilot
holes and driving screws.
suzanne on March 28, 2016:
holy smokes no routering or dadoing! LOVE THIS! Can't wait to get started.
Gerald brookshire on June 20, 2015:
Very good design. I built one in a very short time and hung it on a power pole about 10ft. up. Within 10 days i had a small swarm in it. I had used some lemongrass oil and honey comb foundation . left them in it for a couple of weeks and took it down and transferred to hive. They have done well. Thanks for posting your plans for us.
Terryrecruiter on June 10, 2015:
awesome, had buddy text me that his mom had a swarm out front, i made the NUC in 20 minutes and was rolling to go get my first bee rescue. the moved right in... had a few hang around back door then we headed home. Thanks.. ps it held 6 racks but i only used 4 so the swarm had room
Jon8898 on April 30, 2015:
Brilliant NUC Box found your page at lunchtime, went to the timber store, had it made before teatime! Only one problem, being in England we use metric plywood (I used 12mm which is more than sufficiently strong) but this made the measurements wrong.
I got round this by leaving a small lip around the floor and the roof, and placing additional double skin on the front and back walls.
However, I was so impressed with the design I will be making another one, and this time I'll calculate my own measurements to accommodate the metric sizes. Once I've done this I'll post the dimensions here for others.
anonymous on September 11, 2013:
THERE IS A BIT ONLINE WHERE YOU CAN DOWNLOAD A DEPT OF AGRICULTURE PANS WHERE YOU CAN BUILD FOUR NUCS FROM ONE FULL PIECE OF PLYWOOD.
anonymous on June 13, 2013:
Simply brilliant, this is a great design and thank you for posting. I will defiantly
Be making some, my hive boxes have a rebate so as the frame sits on the ledge there is still a bee space under it, you can purchase these runners from bee suppliers in the uk so I will be adding these, but this is the best design I have seen, can't wait to get started.
anonymous on May 09, 2013:
do you have instructions on frames and how many can your nuc hold
jeffrichley lm (author) on March 28, 2013:
@anonymous: They work great! I've made a ton of splits with them. I've always been amazed that they work so well and are soooo cheap!
As far as Hoffman Frames, I've never tried them before. I did a quick look on the interwebs and didn't find the dimensions. Are they the same dimensions as a Langstroth? The only concern that I would have is if the frame is more narrow on the bottom than the top the bees may try to fill the gap in. Some pics online seem to show them in a "V" shape and some look rectangular. I've never actually seen one, what are yours like?
If they are a "V", you could always adjust the shape of the box a bit to make a tighter fit.
jeffrichley lm (author) on March 27, 2013:
@anonymous: Typically, I use wooden frames with wax foundation. I do have friends that use the plastic frames. What ever you have on hand is good.
anonymous on March 27, 2013:
@anonymous: Hello Mel in Cornwall
I'm going to try making this nuc box & I thought I'd check a couple of things with you? A) how did you get on? & B) Do Hoffman Frames fit in it?
Many thanks
anonymous on March 24, 2013:
what do you use for frames?
jeffrichley lm (author) on March 09, 2013:
@anonymous: Ah, that is a great question! I'll make a new lens about that, but basically I made a new contraption that feeds from on top.
I took a spare 1x4 and cut it in 4 to 5 inch sections, it takes two pieces for each hive stacked on top of each other. The bottom gets the middle cut out (to make it look like an empty square. The top gets a hole drilled in it.
Drill a half inch hole on top of the lid towards the front of the box. But the empty square piece over the drilled hole (the drilled hole should be in the front of the square. Put the piece with the drilled hole on top of the square with the hole on the opposite end of the square from the lid hole. This is in case there is any drips, it won't go directly into the hive.
Once assembled, put a used water bottle (with sugar water and holes poked in the lid) on top of the contraption, upside down of course. The bees will crawl out of the lid hole, scamper down the little hallway and slurp the sugar water from the holes.
anonymous on March 08, 2013:
@Bash51214: How do you feed the bees in the nuc since there's no front entrance to slide in a front feeder?
jeffrichley lm (author) on October 04, 2012:
@anonymous: Hmm, Jose I'm not sure I know which holes you are talking about. Are you talking about holes in the frames or in the box?
anonymous on October 04, 2012:
Hello, Im in Chile and I wood want to know how to make the 4 holes of my beeframe¨s side bars, using a drill with 4 brocas. Excuseme my english..Thanks a lot.
jeffrichley lm (author) on September 26, 2012:
@anonymous: That's exactly right. Then you dump your bees in. As a side note, if you can get a frame of brood, you are almost guaranteed to no have your bees abscond.
anonymous on September 25, 2012:
@jeffrichley lm: I'm new to all this, so after building the box, do you put frames in?
jeffrichley lm (author) on July 30, 2012:
@anonymous: You are more than welcome Papa Jim. If you take a snapshot, I'll post it for everyone to see. I'd love to get a photo gallery going here!
jeffrichley lm (author) on July 30, 2012:
@anonymous: Wow Ken, thank you very much. I feel honored that you feel this is that good. Makes me want to keep posting! :)
anonymous on July 28, 2012:
Following your instructions, i built four nucs from one sheet of plywood, saves a lot of money over buying them, thanks for the good instructions
anonymous on June 26, 2012:
This is awesome!!! Thank you very much for posting. It's people like you who make the Internet a great place to find stuff.
anonymous on June 10, 2012:
Have been looking for cheap easy plans to make, thanks for the heads up from last poster that sizes are different over here to USA Nuc boxes over here are really silly price so looking forward to giving this a go. Cheers!
jeffrichley lm (author) on May 27, 2012:
@anonymous: Karina, that's very cool. Let me know how it works. If you have the converted measurements, I'll post them in here.
anonymous on May 27, 2012:
Just made your nuc, all went well other than the fact that I live in England and the measurements are different for a national hive. We but in an extra support on both sides so that the frames fit. Hope it is going to work...
jeffrichley lm (author) on May 25, 2012:
@anonymous: Very cool! I sure hope they have a great time making them. Let me know if there are any other good plans you'd like to see.
anonymous on May 24, 2012:
I just posted about this on a site called Lumberjocks, a wood working community that spans the world. These guys will build it right and maybe even throw in some nice furniture to boot.
jeffrichley lm (author) on May 16, 2012:
@anonymous: These are 5 frame boxes but I have heard of folks just putting 4 with extra space on the sides.
anonymous on April 20, 2012:
These plans look like just what I need! It's almost stupid I have to ask this (since I do keep bees -- but this will be my first time doing splits) but will this make a 4- or 5-frame nuc? THANK YOU for putting these up!
anonymous on March 31, 2012:
Well making a nuc box is just as easy as can "bee" with your directions....just could not resist. A great DIY.
anonymous on March 14, 2012:
Yes, this is quite close to what I was hoping for. I do look forward to the traditional way of bottling as we are aiming for a more conservative approach, homestead if you will. your mentioned nuc could fit probably 3 slots right? And how long you think It'll take to be ready for harvest? We are planning to build several for kids environmental activities..
jeffrichley lm (author) on March 13, 2012:
@anonymous: Thanks for the kind words, I certainly appreciate it. The closest that I have for harvesting honey right now is Using a Honey Extractor. Take a look at that and let me know if it was what you were looking for. If not, I am going to be publishing a new one that gives much more details about getting it out of the hive and into bottles in the next few days. Hope you enjoy!
anonymous on March 13, 2012:
This is by far the most practical guide ever. Thank you! Forgive me for asking how or if you documented the harvesting part? are there steps pictured?
jeffrichley lm (author) on March 09, 2012:
@anonymous: Absolutely! This nuclei box is a great way to catch swarms. I'm getting ready to do a lens about trap boxes that I use. These are the same boxes that I useand then transfer to other hives.
anonymous on March 09, 2012:
i wonder how many top bars this accommodate? i am a backyard beekeeper with top bar hives. dunno if i can adopt your plan to collect some swarms...
Blackspaniel1 on February 29, 2012:
Nice lens
SayGuddaycom on February 27, 2012:
I've never even thought about it!
anonymous on February 22, 2012:
Nice instructions here, simple and to the point.
jeffrichley lm (author) on February 19, 2012:
You are more than welcome, I'm glad you enjoyed it. Are you a beekeeper?
Bash51214 on February 19, 2012:
i really enjoyed your post.. thank you..
How To Create Honey Bee Box
Source: https://dengarden.com/gardening/6-easy-steps-to-make-a-nuc-box
Posted by: taylorcultin.blogspot.com
0 Response to "How To Create Honey Bee Box"
Post a Comment